Invite and manage active contacts
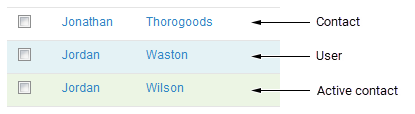
You can invite contacts to become active contacts, which gives them access to your company’s web-based Whispir contact portal. In the portal they can view and update their contact details at any time, receive messages, and possibly subscribe to distribution lists. The invitation email contains a URL link to a web page where they create their username and password for accessing the portal. Once they’ve logged in they’re considered to be active contacts (and on the Contacts List page they’re now shaded green).
Notes:
- Contact portals need to be enabled for a company by a Whispir system administrator. For more information contact the Whispir Support Team (support@whispir.com).
- You can also invite contacts to become active contacts if your company has an app registered against it in Whispir (such as Whispir’s pushie app) and you want to give them access to it. A different invitation email is sent to these contacts.
Invite an active contact
- Ensure that the required workspace is on the Workspace toolbar.
- Hover over the workspace to view the Workspace menu.
- Under Contact Management click Invite Active Contact. (If you can’t see it, click More to view more commands.)
The Invite Active Contact page opens. - Click To to open the Address Book, and then find and select the relevant contacts and click Ok.
The contacts are added to the To field. - In the Application field, under Whispir Applications select Whispir Community, which represents your company’s contact portal.
- In the Message Template field either leave the default template or select a new template.
- In the Subject field update the email subject line if necessary.
- Edit the message as required.
You can click Rich Formatting to view the rich text formatting toolbar. See Apply rich text formatting to message content for more information.
Note: The Whispir Mobile option is rarely used.
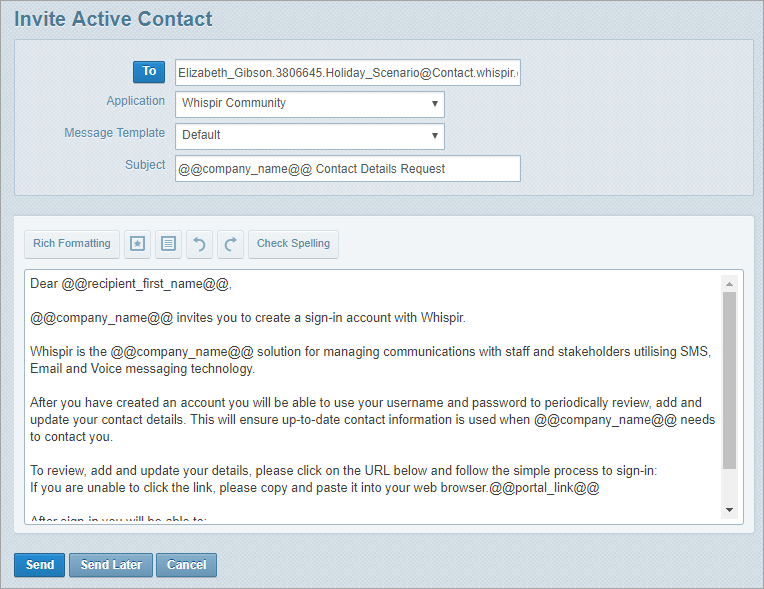
- Choose a send option:
- Click Send to send the invitation now.
- Click Send Later to schedule the send action. On the Schedule Contact Reminder page leave the Send Once option selected, set a date and time for sending the invitation and then click Save.
The scheduled message is listed on the Scheduled Items page. - The Contact Management Log Details page displays the sent message details.
- The contact receives an email containing a link to the contact portal registration page where they can enter and submit their registration details. They’re then sent a confirmation email containing their contact portal access details. They can now log in to the portal at any time and update their own details.
When the email invitation is sent:
Review and resend invitations
- Ensure that the required workspace is on the Workspace toolbar.
- Hover over the workspace to view the Workspace menu.
- Under Contact Management click Contact Reminder Log. (If you can’t see it, click More to view more commands.)
The Contact Management Log Details page opens. It lists all invitation messages (and any contact update reminders) that have been sent. - To resend an invitation:
- Click View Recipients in the Action column beside the invitation.
- On the Contact Management Recipients Details page select the relevant recipients and click Send.
- On the Contact Update Reminder page modify any message details if required and click Send.
View recipient status
- Ensure that the required workspace is on the Workspace toolbar.
- Hover over the workspace to view the Workspace menu.
- Under Contact Management click Contact Reminder Log. (If you can’t see it, click More to view more commands.)
The Contact Management Log Details page opens. By default it displays entries for all statuses for the last 7 days. - To change the status and date range click
 and then select a status, enter the required From and To dates and click Search.
 - Click the View Recipients action link next to the relevant invitation or update reminder.
The Contact Management Log page opens, displaying the status for each recipient. - To resend the invitation or update reminder to a listed recipient, select the check box next to their name and click Send.
- If the initial email was an invitation, the Invite Active Contact page opens.
- If the initial email was an update reminder, the Contact Update Reminder page opens.
- Complete any other details as required and click Send.
The recipient is already listed in the To field.
Revert an active contact to a contact
Once a contact has been made an active contact you can’t remove their access to the contact portals. The only way to return an active contact to normal status is to delete them and re-add them as a new contact. See Delete contacts.
Identify active contacts
There are a number of ways to identify contacts that are active contacts.
- Ensure that the required workspace is on the Workspace toolbar.
- Hover over the workspace to view the Workspace menu and click Contact List.
The Contact List page opens at the View Contacts view. All active contacts are shaded green.
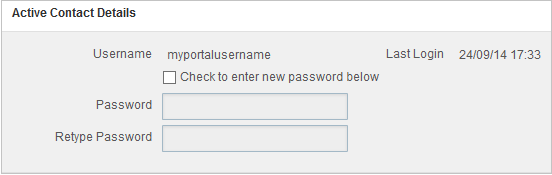
When a contact becomes an active contact an Active Contact Details section is added to their contact profile. It displays their contact portal username and the date stamp for their last login. You can change the contact's portal password from here if required: Click Edit to activate the fields.
You can configure the Contact report to include the Portal Status field. Follow the steps in Run the Contact report, ensuring you select PortalStatus in the Available Fields pane.
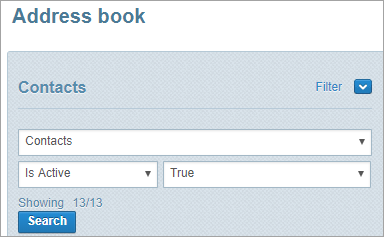
Whenever you access the Address Book in Whispir (such as when you’re adding recipients to a new message) you can choose to filter the contacts using the Is Active filter field and selecting True.