Import contacts
The Import Contacts feature lets you add new contacts in bulk to a particular workspace by importing their details via a .CSV file. Whispir provides a template that contains all the data fields for new contact profiles. You download the .CSV file from the Import Contacts page and then add as many contact details as you require, one contact per row.
If you want your imported contacts to also be added automatically to other workspaces, your company administrator can set up specific contact mapping rules for you. The rules are applied as the file is imported. See About Contact Mapping Rules.
Notes:
- While it’s possible to import contacts via a vCard file, Whispir recommends that you use a .CSV file instead.
- Whispir also offers an alternative way to import contacts – the Contact API module. It can integrate with your company’s external/third-party contact management system to import contacts regularly and map them across multiple Whispir workspaces. See About the Contact API module for more information.
Some rules for preparing the .CSV file
- Avoid changing any of the column headings in the template. These allow the data to be mapped correctly to the contact profile fields in Whispir during the import process.
- At minimum you must enter values for every contact in the FirstName or LastName column (or both), the WorkCountry column, and either the WorkEmailAddressPrimary or WorkMobilePhonePrimary column (or both).
- Delete the sample user data in Row 2.
- Ensure you save the updated file in .CSV file format.
Steps
- Ensure that the required workspace is on the Workspace toolbar.
- Hover over the workspace to view the Workspace menu.
- Under Contact Management click Import Contact. (If you can’t see it, click More to view more commands.)
The Import Contacts page opens.
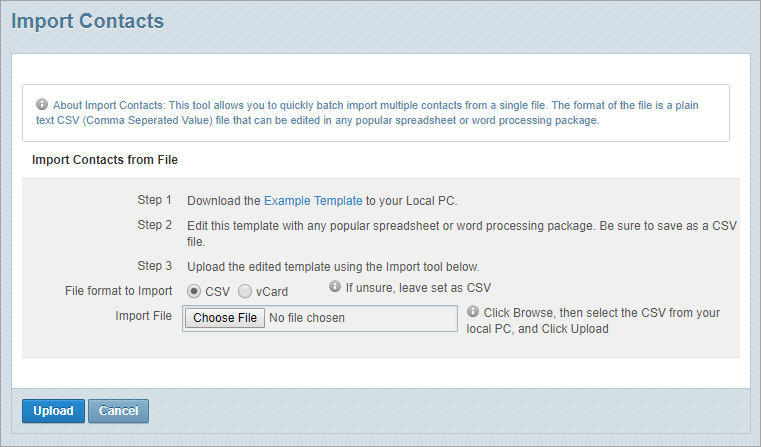
- Click Example Template to download the .CSV template ‘import-contact-template.csv’.
- Open the file in Excel and add all the required contact details to it.
Refer to Some rules for preparing the .CSV file for help with preparing the file. - Save the file as a .CSV file with a new name.
- On the Import Contacts page ensure CSV is selected and click Choose File or Browse (depending on the browser you’re using) and then browse for your saved .CSV file.
- Click Upload.
The Import Contacts page refreshes to display the import options and all the fields available for import.
Note: The list of imported fields corresponds to the column headings in your .CSV file.
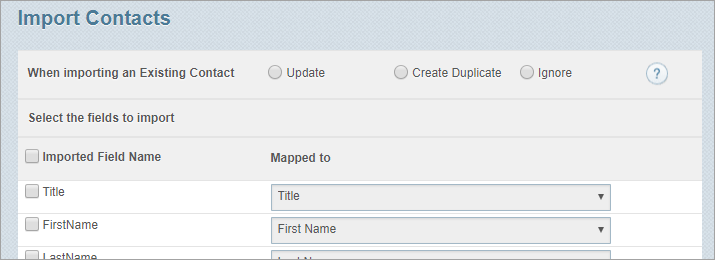
- (mandatory) Select an option for managing your existing contacts during the import process: Update, Create Duplicate or Ignore.
The table below explains each one
| Import option | Action |
|---|---|
|
Update |
Select Update if you want to update your existing contacts as well as create any new contacts. This option is often used when the import file includes changes to existing contacts. The primary work email address, primary work mobile phone number, first name and last name in the imported file are compared to those of existing contacts.
When is an imported record considered a match for an existing contact?
|
|
Create Duplicate |
Select Create Duplicate only if you don’t want to alter your existing contacts in any way, but instead you want to create a clone (duplicate) of any matches. The contact details in the imported file are used to create new contacts regardless of whether any details match those of existing contacts. Tip! On the Contact List page you can use a filter to compare the creation date and time of duplicate contact records. Click |
|
Ignore |
Select Ignore only if you don’t want to alter your existing contacts in any way. Only new contacts are imported; existing contacts are ignored. The primary work email address and primary work mobile phone number in the imported file are compared to those of existing contacts. (First name and last name are not considered.)
|
- Select the check box next to each field to be included in the import process.
- If your .CSV file includes any column headings that don’t match directly to a Whispir field (in the Mapped to list) select the appropriate fields to map them to.
- Click Import.
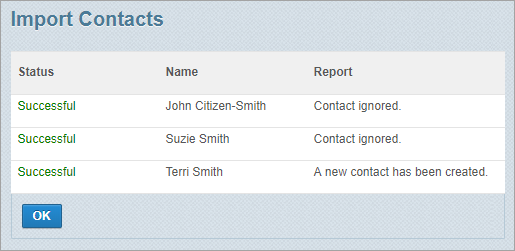
The Import Contacts page lists the name and status of each imported contact. All successfully imported contacts now have a contact profile.
Note: If the import failed for any contacts read the information in the Report column, correct the relevant data in the .CSV file and upload the file again.