Add a new user and activate their account
Role: Company Administrator.
As a company administrator you can create an account for a new Whispir user. Their initial status is Pending. When you approve the user, their status changes to Inactive and they’re sent an email containing a link to a Whispir web page where they can unlock their account. Finally, when their account is activated their status is Active, indicating that they can now successfully log in to Whispir.
Note: You can also add user accounts in bulk. See Import users to add accounts in bulk.
Steps
Add a new user
- Open the Manage Users page (click
 > Administration sidebar > User Manager).
 - Click Add New User.
The Manage User page opens. - Enter as many details for the new user as applicable.
- Enter a username for the user. The standard format is firstname.lastname.
- Enter their password and repeat it. (They’re prompted to change this password when they log in for the first time.)
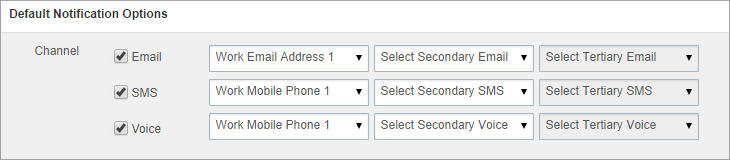
- Review the Default Notification Options section at the bottom of the page.
- Select or clear the check boxes to allow or disable the ability to send system messages to the user via that channel.
- Specify the primary, secondary and tertiary selections if you need to define where to send a message if it was initially undeliverable. For example, if a user has a work email address and a personal email address, the message could be escalated to the personal address if the work address couldn’t be reached.
Note: Fields marked with an asterisk * are mandatory.
Note: These default notification options don’t relate to receiving typical Whispir messages (the default notification options in a contact profile cover that). Instead they apply to situations where users might receive other types of communications via the Whispir platform (for example, delivery reports for messages they’ve sent, password reset emails, or communications from a specific inbound email/SMS workflow). Decide if the user needs to be able to receive these types of messages or not.
If you added the user’s phone and email details to their profile the options are selected automatically.
Note: You’ll only be able to select an option in a field if you’ve entered the relevant phone number or email address in the corresponding field higher up on the New contact page.
- Click Save.
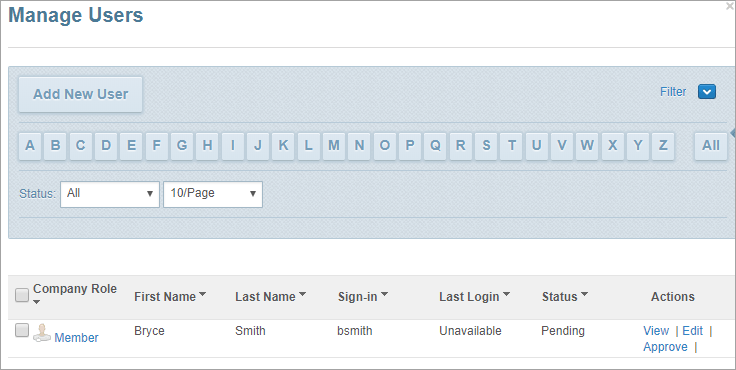
The new user appears in the user list on the Manage Users page. They’re automatically assigned the default company-level role (which is typically Company Member) and their status is Pending.
Note: If you need to change their company role follow the steps in Change a user’s company or workspace role.
Approve and activate the pending user
- On the Manage Users page find the new user with the status of Pending.
- Click Approve beside the user’s name.
Their status changes to Inactive. They’re automatically sent an account activation email.
Tip! To help you find the user select Pending in the Status field or click ![]() to search using the filter options.
to search using the filter options.
There are now two ways to activate the account.
Method 1: Let the user activate their own account
Whispir recommends this method as best practice for activating a user account because it ensures that the user enters their own password. (In contrast, Method 2 requires a company administrator to manually contact the user to give them the password they created for them.)
Note: Don’t forget to assign the user to the workspaces they’ll be working in and set their workspace role for each one. You can do this while their status is Pending, Inactive or Active. See Assign users to workspaces and Change a user’s company or workspace role.
When the user receives their account activation email they perform these steps:
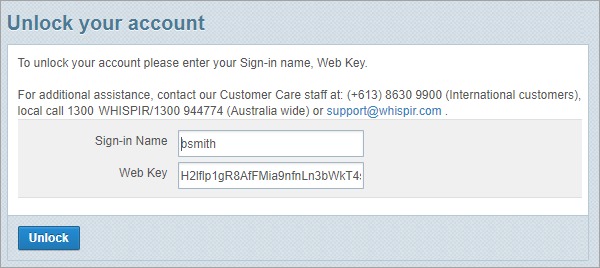
- Open the email and click the link to open the Unlock Your Account page in a browser window.
It shows their new username. - Click Unlock.
- On the Change Your Password page, enter a password and repeat it and then click
 .
.
The user is automatically logged in to Whispir and their status is now Active.
Method 2: Manually activate the user’s account and send them their login details
This method requires you to contact the user to give them their username and password. It’s often used when the new user doesn’t require a valid email address or mobile phone number in their profile.
Note: Whispir recommends that you use Method 1 instead where possible.
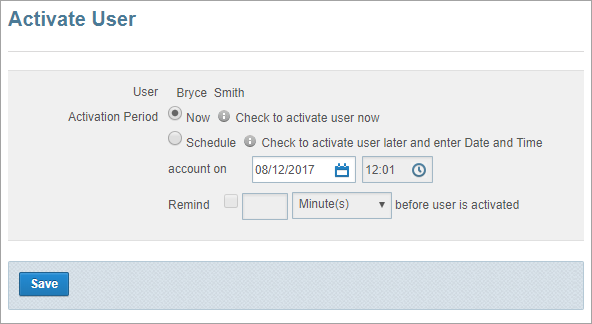
- Click Activate beside the user’s name.
The Activate User page opens. - Do one of the following:
- To activate the user’s account immediately select Now.
- To schedule the account activation for a later time select Schedule and then enter the date and time for activation.
You can also be sent a reminder by selecting the Remind check box and entering the reminder period.
- Contact the user to give them the username and password you entered in their new user profile.
- Click Save.
The user now appears in the user list on the Manage Users page with a status of Active. They currently only have access to the My Company workspace.
When they log in to Whispir for the first time they will be prompted to change their password.
Note: If you can’t remember the password, open the user profile, select the Check to enter new password below check box, enter a new password and save your changes.
Important! Whispir recommends that you now proceed to assign the user to the workspaces they’ll be working in and set their workspace role for each one. This ensures that the workspaces are available to the user as soon as they log in. See Assign users to workspaces and Change a user’s company or workspace role.