Create a new contact in a workspace
You create a contact profile in a workspace for anyone (or anything) you need to send messages to from that workspace. A contact profile in Whispir needs to include enough information to be able to:
- Identify the contact. At the very least this will be first name and last name
- Identify the contact for any dynamic distribution lists they might be added to
- Support any @@ tags (at-at tags) that your messages or templates include
- Send the contact messages via their preferred communication channels, such as SMS and email.
Steps
- Ensure that the required workspace is on the Workspace toolbar.
- Hover over the workspace to view the Workspace menu.
- Under Contact Management click New Contact. (If you can’t see it, click More to view more commands.)
The New contact page opens. - Enter as many details for the new contact as applicable. Ensure there’s enough data for the contact to be identifiable and contactable.
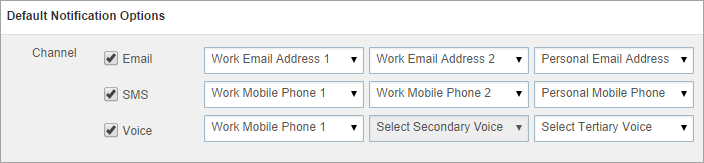
- Review the Default Notification Options section at the bottom of the page.
As you added the contact’s phone and email details to their profile the options were selected automatically.- Select or clear the check boxes to allow or disable the ability to send messages to the contact via that channel.
- Specify the primary, secondary and tertiary selections if you need to define where to send a message if it was initially undeliverable. For example, if a contact has a work email address and a personal email address, the message could be escalated to the personal address if the work address couldn’t be reached.
Note: You’ll only be able to select an option in a field if you’ve entered the relevant phone number or email address in the corresponding field higher up on the New contact page.
Note: Fields marked with an asterisk * are mandatory.
- Do one of the following:
- Click Save to save your new contact.
The View Contact page opens, displaying the details you entered for the new contact. You can then click Contact List at the top of the page if you want to view your new contact in the list. - Click Add More to save your new contact and open a new blank form to create another contact.