Create a shared distribution list
You create a shared distribution list in the same way as a static distribution list: You manually select and add recipients and/or other existing distribution lists to it. Unlike static distribution lists however, shared lists are available for mapping to (sharing with) other workspaces.
Enter the list’s basic details
- Ensure that the required workspace is on the Workspace toolbar.
- Hover your mouse over the workspace to open the Workspace menu.
- Under Contact Management click New Distribution List.
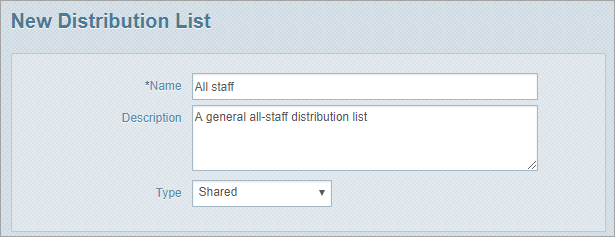
The New Distribution List page opens. - (mandatory) In the Name field enter a name for the list.
- In the Description field enter a description for the list.
It should provide more information about the purpose of the list and its recipients.
Choose a meaningful name. Distribution lists are identified by their name alone, so the name should easily identify the purpose of the list and who might be on it.
Tip! Make sure you don’t add any spaces at the end of the name and don’t include any special characters (for example, & or _).
- In the Type field select Shared.
All publishing options are removed as shared distribution lists cannot be subscribed to or displayed in private portals.
- Go to Add contacts to the list.
Add contacts to the list
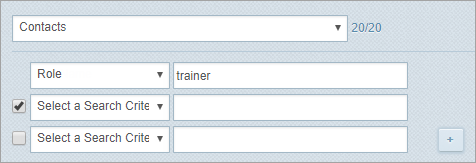
- In the first field in the Add Members section select an option – either Contacts or Distribution Lists.
Note: Each ‘Distribution Lists’ option represents a display order or grouping for the distribution lists when they appear in the pane below the search criteria fields.
You can use the search filter options in the Add Members section to locate particular contacts:
- Select a search filter option from the drop-down list and type a term in the field beside it.
For example, select Role and then type ‘trainer’ in the field next to it to find contacts who are trainers. - To help you further refine your search you can add more search criteria:
- click
 to display another filter field. Select the check box beside it to indicate you want to apply this criterion.
 - Click
 to add more fields and select your criteria.
 - Click Search.
Tip! You can add multiple terms, separated by commas, to the search field beside the drop-down list. For example, entering ‘Tinh, Bill, Sue’ when you select First Name returns contacts with these first names, as well as names starting with these letters.
- Select the contacts or distribution lists in the left pane and click Add To List to add them to the pane on the right.
(Press and hold the CTRL key to select multiple separate entries, or press and hold the SHIFT key to select a block of entries.) - To remove a contact or a distribution list from the right pane select them and click Remove From List.
- If you’ve added individual contacts and you now want to add one or more distribution lists (or vice versa), repeat Step 1 but this time select the other option and then go to Step 2.
- Go to Save your distribution list.
Save your distribution list
- Do one of the following:
- Click Add Escalation List if you want to define an escalation path for the list. See Add and edit person-to-person escalations.
- Click Save to finalise your list and view it on the Distribution List page. Its access type is Shared, which means it’s available to be shared with other workspaces the user has access to.
- Click Save and Add More to save your list and open a new blank form to create another distribution list.