Register a callback URL
Role: Company Administrator.
Developers who are using Whispir's API functionality configure callback settings to define where Whispir must either:
- forward a message response to
or - forward information about an undeliverable message.
Callbacks are designed to be triggered only from APIs. They can also be used in API mappings to send text-in content from a user/sender to a third-party application or to your company’s own application, where you can then process the content.
Note: Callbacks can’t be triggered for messages sent via the Whispir platform user interface.
For detailed developer information about callbacks visit Whispir for Developers (https://developers.whispir.com/docs/callbacks).
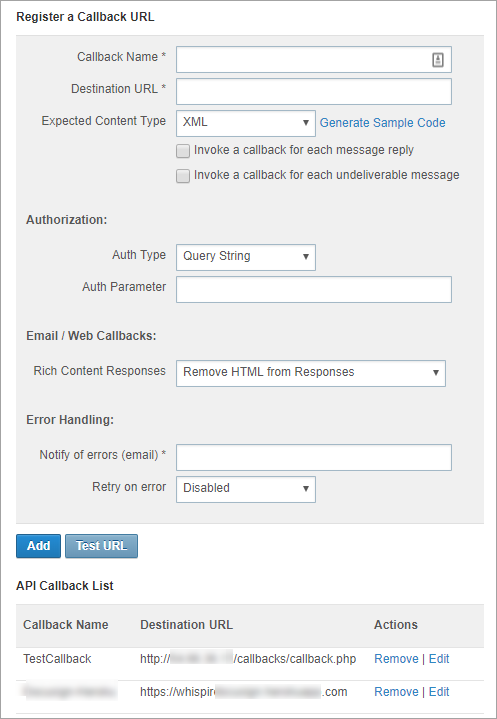
Register a Callback URL
- Open the Company Settings page (click
 > Administration sidebar > Company Settings).
 - In the Settings pane on the left expand Portals & Apps and click Manage API Callbacks.
- Enter the required settings:
- Callback Name: Enter a name for the setting. It can contain alpha-numeric characters, underscores and spaces.
- Destination URL: Enter the URL that you want Whispir to call back or post information to.
- Expected Content Type: Select the format for the callback data – XML or JSON.
And then click Generate Sample Code to view the payload body format that Whispir sends to you during a callback. Ensure you build your parser to process this code. - Select the relevant check boxes to specify when the callback is to be triggered:
- Invoke a callback for each message reply
- Invoke a callback for each undeliverable message
- Auth Type: Select a custom type – Query String or HTTP Header.
- Auth Parameter: Enter the parameter that you want to authenticate to ensure that the request is coming from Whispir only.
- Rich Content Responses: Select an option to either retain or strip the HTML code from responses.
- Notify of errors (email): Enter the relevant email address. If Whispir can’t successfully make the callback because your service is down or unavailable, Whispir will send an email notification to this address. The email includes the content of the callback.
Note: Only one email is sent per day, not one for every error. - Retry on error: Select an option to specify whether Whispir should perform retries if accessing the callback service fails:
- Disabled: Whispir will attempt the callback once and then an email will be sent.
- Enabled (every 5 mins): Whispir will retry the callback every 5 minutes for 24 hours.
- Click Test URL to check if your callback is working properly or not (Note: No actual data is sent.)
- If it works, the word ‘Success’ appears in green type beside the Test URL button.
- If it fails, the word ‘Failure’ appears in red type beside the Test URL button.
- Click Add.
Your callback setting is added to the API Callback List at the bottom of the page.
Edit a callback setting
- In the API Callback List on the Register a Callback URL page, click Edit beside the setting you want to update.
The details populate the fields at the top of the page. - Make the required changes.
- Click Add.
The callback URL is automatically tested.- If the test is successful your changes are saved.
- If the test fails a message advises you that it has failed and prompts you to click OK or Cancel.